Oct 21, 2010

Gordon Prill and Kaboodle

Portraits for my new friends at Gordon Prill:
Shot on a white seamless the background and drop shadow are added in post.

The Kaboodle holiday card:

Climbing a sketchy ladder is also in my skill set.

Oct 11, 2010

Retroactive blog update

I have to admit I haven't been very diligent about updating my blog since I've moved. Here is what I've been up to over the past two months. Wedding update coming soon!

Tylara. North Park. San Diego, Ca.

Chloe. San Diego, Ca.

Megan. Rancho San Antonio Open Space. Los Altos, Ca.

Greta. Mirian Bear Regional Open Space. San Diego, Ca.

Corinna. Wilder Ranch State Reserve. Santa Cruz, Ca.

Aug 10, 2010

What have I been doing?

Not sure. I moved back to the Bay Area and I'm feeling out my options. I felt like I should post something though, so here is a look at one of my photoshop sessions:

Jul 10, 2010

I had three shoots over the last three days while San Diego delivered the worst July weather I've ever seen. When the forecast for 5pm says 80% overcast, I have to change up my approach a little. Check out the models:

July 7th: Paige Montgomery @ Mirian Bear Regional Park


July 8th: Leona Snell @ Mission Trails Regional Park


July 9th: Greta Proctor @ Torrey Pines State Reserve

These overcast conditions taught me a few things. There is a general agreement that a light cloud cover gives a softer ( more flattering ) light by cutting and diffusing the suns direct rays. My problem was that this was not a 'light overcast', this was a 'doom and gloom with chances of showers' kind of overcast.

Even though the sky appears evenly gray in all directions there is still a 'key light' direction where the sun is at the moment. When your model faces into this light the result is a flat, yet flattering soft and even look. When facing away from this 'key/sun' the light will appear to wrap around the sides of the model's face slightly, which is also a nice look. ( In the examples above, #1 is facing directly west into the key, #2 is turned 3/4 away from key, and #3 is with the key behind the model - notice the wrap in this one especially)

The biggest problem is filling in the dark eye sockets that result from there being so much overhead light. This can easily be solved with a little reflecting from below. Be careful not to fill more than the key or you'll get a weird, horror-type look. I found that having the model hold the bounce card herself allowed me to shoot with longer lenses and manually focus at apertures below f2, ( which I usually don't get to do because I'm holding my own bounce. )

An added bonus is the way this low bounce lights up the eye:


So don't be discouraged by overcast. In many ways it was easier to not have to fight the sun, but I do miss those backlit highlights.

Jun 30, 2010

BTS pictures

It's really rare that I ever get any behind the scenes shots of me working, but here are a few from this year:
This is the magic board in action. See my earlier post on this lighting setup: The Magic Board.


Video Shoot:

Jun 29, 2010

My 1963 Voighlander Ultramatic


This camera is amazing. Leave it to the Germans, the West Germans to be exact.


Not only is the light meter powered by the stylish photocell on the front, but the viewfinder has a periscope view of the aperture / shutter speed settings. This camera was seriously ahead of it's time.

I really wish you could hear the sound of the shutter in this camera. Its such a forceful, hollow sound. Pure evil.

Jun 23, 2010

More of Kathryn, Ami & Carin

Here are some other noteworthy ones from my 5-30 shoot with these great dancers:


There is no trick or photoshop to this. It's basically a bellyflop onto the earth.

Jun 15, 2010

Krizia

More to come as always:
This gives me a Kubrick, Herzog creepy feeling. Love it.

Jun 3, 2010

Kathryn, Ami & Caryn @ Torrey Pines

Click to enlarge. 1680x1050px for a desktop background. Otherwise I would not have made this so stylized.

Let me say this again:
Working with trained dancers is so easy it feels like cheating. It might actually be cheating.

Jun 1, 2010

The joy of homebrew

Maté-veza. A corn-brewed beer in the Mexican style with a maté kick. Serving suggestion:

May 29, 2010

Take a minute for Dennis Hopper

I promise not to do this often, but we need to acknowledge the passing of Dennis Hopper. It probably depends how familiar you are with his work, but I feel like I just lost a crazy uncle or something.
I really don't care if you wish to dispute this; His best role was in Francis Ford Coppola's "Apocalypse Now" where he plays the photographer who has been living amongst the followers of the infamous Colonel Kurtz. Granted, he is only introduced in the last 30 minutes of the film, but his compulsive enthusiasm reignites the screen in such a 'lengthy' film.

One of my friends from film school once said to me, "Imagine if there was really film in those cameras. There must have been right? That's what Coppola would do."

This is not a role that Robert Redford or Clint Eastwood could have pulled off. Well, maybe they could have but I can't imagine it because Dennis truly goes off the deep end in this film. ( I mean, you have to be insane to follow Coppola into the jungles of South Vietnam for months of filming... but my confused admiration for the making of Apocalypse Now will have to wait for another blog article )

The easiest way to sum this up is... If you haven't seen him in Easy Rider, you don't even know Dennis Hopper:
This film puts hippies and beatniks to shame. Seriously. For the last twenty minutes of the film they just drop a ton of acid in a cemetery in New Orleans and film it... This production had drugs as a line item in the budget... Lets just say you should see it.

Philosophical? Existential? I'm not sure what they were going for when they made this film ( because they were probably too high to have a cohesive vision ), but it is certainly a masterpiece.

May 27, 2010

Nick Brandt blows my mind

So I'm not usually like, "ohh check out this photographer..." But when something blows me away like these wildlife portraits by Nick Brandt, I have to.
http://www.nickbrandt.com/index.cfm


May 24, 2010

Vanessa and the Magic Board

I had a great shoot yesterday up in Oceanside with Vanessa. It was a classic Anthony Robertson shoot: no stylists, not lights, no bs.... only The Magic Board! I really wish I had a picture to show of me using my magic bounce board, because it looks ridiculous, but I'll do my best to describe its practical applications. The simple description is how beautiful this light looks:
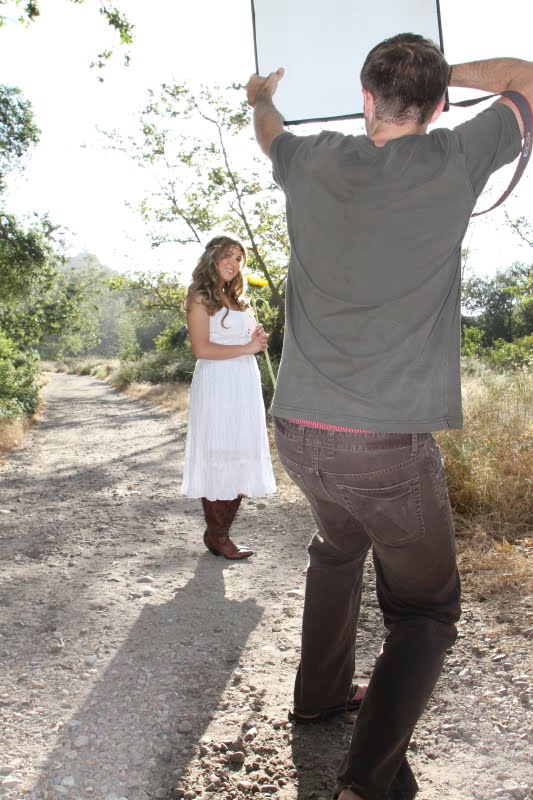
The 'magic board' was basically a product of my poorness. To the untrained eye it might look like a 20"x30" foam presentation board from CVS with some tin foil gaff taped to it. And, well, that's basically what it is. I've actually got some shiny paper product rather than foil, but its probably comparable to the 'soft' side of tin foil. ( Tip: crumple your foil prior to application for more diffusion )

Now here is the big secret. I'm serious. Pay attention. Not only is this a bounce board, it's also a lenser. ( Lenser = anything that keeps a flare (sun) out of your lens ) This is why nobody but me can use the magic board. Here is a little diagram to help you understand:


Just imagine how funny this looks in real life. Here is the crucial part in closeup.


Notice that the field of view of the camera (blue/green) is not obstructed by the board or flooded by the direct sunlight.

Reap the benefits:
1) subject is beautifully and powerfully backlit
2) The magic board will produce as much fill as you want, often way more than a model can tolerate.
3) The board flags off any lens flare ( unless you want some )

The source:
By working at this relative proximity ( I shoot a 50mm generally, so a 3/4 shot size on a person leaves me about 4.5 feet away ) this board is a 'large' source, producing a soft, wrapping light. The crumpled reflective surface provides additional diffusion.

Pros:
- No assistant required
- Cheap to make
- Free to use ( no batteries or power )
- Beautiful natural light aesthetic

Cons:
- You will look like a tool and other photographers will probably laugh at you.
- Often it is not possible to fill with enough light to capture a brighter background. This can be solved by selectively choosing a dark background or some highlight recovery in post processing.
- This technique will limit your working distance from your subject. The reflected light is only useful within 10 feet of your subject/model so you're either using a 50mm or shooting close ups.

Stick a 50 on your Dslr and some tin foil on a board and make me proud.

This is the way I light 90% of my work. If you don't like it you can go suck an egg.

May 9, 2010


This is my pocketknife that I've owned for over fifteen years now. Not only has it survived boy scouts and film school, but also multiple moves and random adventures.


That's my mom's labeling work. My favorite memory with this knife was from one afternoon when I was cleaning it. I was using nail polish remover and I must not have realized how potent it was because I accidentally melted my fingerprints into the plastic outer casing:


I think I might photograph more of my things.

May 8, 2010

DIY #1: Dry mounting at home!

I was going to take my own pictures and write a fancy blog article about the ease of dry mounting at home, but I've found that someone has beaten me to it. Here's a 15 minute video outlining the whole process: http://www.depressing.org/archives/mounting56k.wmv

I'll summarize the important points for you, but I'm going to assume you already know the basic steps of dry mounting the traditional way. ( Here is a quick rundown: http://www.itg.uiuc.edu/help/drymounting/ )

I developed this same technique myself about six months ago because it seemed like a straightforward concept. I thought, "I've got an iron. Why won't that work?" And the answer is it works fine with a few pointers.

You will need:
A print to be mounted ( I've only gone up to 8x12 in. )
A piece of matte board
Drymounting adhesive tissue
A ruler
A household iron
An ironing board or heat-safe surface to work on
A blank piece of paper larger than the print

It would be helpful to have:
A paper cutter ( for trimming your print and tissue )
A T-ruler for centering and leveling your print

Tips:
1) Be sure to use a blank piece of paper between your iron and your print. Paper with any kind of ink on it may damage your print.
2) When you print is tacked in place and you're ready to really apply the heat, start in the center of the print and work circularly out to the edges. This will prevent air bubbles and creasing of the print.
3) Do a test mounting with a small print of the same print material as your enlargement. Different paper stocks will respond differently to this process. The 8x10s I get cost $5, which is just enough for me to be concerned about ruining one.
4) Set your iron to the 'synthetic' setting and be sure to keep it moving while heating the print.
5) When finished the print will tend to curl as the adhesive cools. Place a heavy book or other object on the print to help it cool flat. Some curling is inevitable however.

* Remember, dry mounting is a permanent process. Whatever you're mounting your print to is going to be its new background forever.

May 6, 2010

Another shoot with Tylara

Models do like to climb stuff. I can't explain it.

May 5, 2010

Book Recommendation: Collapse

Jared Diamond's 525 page epic, Collapse, was published in 2005 and has become more relevant every year since. The book is basically a chapter by chapter case study of past civilizations ranging from Easter Island to the Greenland Norse, explaining how each of their 'collapses' was highly correlated to the mismanagement of natural resources.

Towards the end of the book he relates the examples to modern day environmental issues, showing how we can learn to properly manage our resources by learning from mistakes made in the past. He address the role of big business as well as the responsibility of the individual in developing solutions to our current problems.

It might sound a little apocalyptic, but Diamond categorizes himself as 'a cautious optimist'. He presents both the merits and downfalls of past civilizations as well as modern examples of people working together to protect the environment.

My opinion: The first few chapters about the Polynesian expansion were fascinating. The section on the Greenland Norse drags on for several chapters and was not my favorite part. The political background on the mining, farming, and oil industries were very educational. I feel like I know more about soil erosion than I would have ever hoped.

Definitely a good read, I recommend it. I'll now be moving on to Jimes Michener's 937 page epic novel, Hawaii. This could take awhile.

Kevan & Carolyn Darling

Back on the 17th of April I had the opportunity to shoot the beautiful wedding of Kevan and Carolyn Darling. The ceremony was traditional Greek Orthodox, meaning there are a lot of built in traditions and the priest sings a lot. Here is the couple circling the altar:

I hadn't met Carolyn prior to the wedding so I think I was possibly even more shocked than everyone else at how beautiful she looked. Kevin was looking pretty sharp himself in his Army Officer's uniform.
Their reception was at a beautiful vacation rental / event venue up in Temecula. The location was incredibly photogenic and some thin clouds rolled in offering the perfect diffusion. I was using a 580EX II speedlite with diffusion for some fill on most of the portraits. Let me make this clear: this was like shooting fish in a barrel.

This one ( above ) is an early attempt at an HDR, but I think it still looks a little overblown. Too much detail in the grass perhaps?

Carolyn and Kevan were possibly the most laid back couple I've ever worked with. It was good to see people enjoy their wedding day so thoroughly without worrying about any of the logistics.