Mar 30, 2010

Retouching, and re-retouching

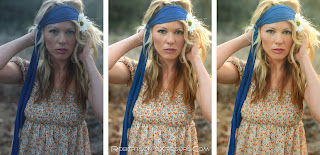
The undeniable plague of the digital workflow is the endless editing and re-editing process. It can be hard to decide that something is 'finished' when you can always come back and launch photoshop again. I say all this because I'm guilty. Just thought I would let you in on the process for one of my portrait retouches:


Would you believe that the underexposed, off-color image on the left is what came out of the camera that evening! I remember being frustrated with myself for not exposing Amber better on this shoot and I knew I was going to take a lot of work to get these images to resemble the way I remember things looking.

The image in the middle is the edit I made back in 2008. It took me probably three hours and I was never quite satisfied, yet I've still used it in my portfolio since.

The image on the right is an edit I did yesterday. It took me only ten minutes and I feel certain aspects are improvements. The elimination of so much skin detail makes it look a little more plastic which I usually try to avoid. I might prefer somewhat of a compromise between #2 and #3.

There is a lot to be said for 'straight out of the camera' photographs, but unless it's specifically stated, you better believe we're all using photoshop :)

Mar 27, 2010

Composition Lesson #2: Correct Headroom

( Check out Lesson 1: The Rule of Thirds )

Incorrect 'head room' is a frequent compositional problem and it really annoys me. This is exactly the picture you get when you ask a stranger to take a shot of your family on vacation. I guess having your face in the center of the picture is better than having your head cut off, but for more reasons than I care to get into it makes for a horrible composition:

In high school I used to work at a cable station and got hours of composition practice doing television production. Almost all the same principles apply to photography, and they can even make your images have a more narrative / cinematic look to them.

The principle of headroom is simple: In any composition involving people there should only be a small amount of open frame above the subject’s heads.

The amount of space to leave should be relative to your shot size ( wider shot = more head room, tighter shot = less. )


In head shots and close up portraits it’s actually the convention to cut off the top of the subjects head slightly.

Like any convention in photography there are exceptions but there isn’t much you can do when experimenting with headroom. If you’re going to violate the convention make it intentional. I do it with my fashion and wedding work when I see an opportunity.

Generally you need either another subject to occupy all that space or at least something visually appealing. Clear blue skies are boring but dramatic clouds work out great. I like the atmosphere of the open headroom because it humbles the subject and shows more of the setting.

Mar 25, 2010

Mexico City again - Tips on traveling with your gear

Just got back from another short trip to Mexico City, Aguascalientes, and Puebla doing some video work for Cisco systems. I took my DSLR along this time but I had very few opportunities to shoot. This was the view from my hotel room on the 21st floor of the W.

I decided to compile a few tips on traveling with your photo/video gear because I was pretty proud of myself for not having to check any luggage or equipment the whole trip.

That being said,
Tip #1 : Don't check your gear if you don't have to.

Nothing is going to screw up your shoot like having your equipment damaged, lost or delayed. If your gear meets your airlines carry on size requirements ( generally about 14 x 9 x 22 in ) take whatever you can onboard. Cameras especially should not be placed with checked luggage.

Here are the few items that you cannot take onboard:
Certain flammable types of film/print stocks.
Compressed ( canned ) air products
Gaff tape ( not sure why, but I've had it taken by security )

Tip #2: Pack light and be creative
Tripods:
I was really concerned on this trip that I would have trouble getting my small photo/video tripod on board but a friend told me a trick. If your tripod has a removable head, unscrew it and put the head in your carry-on. If you strap the legs of the tripod to the outside of your camera bag, boom, all of a sudden you've got only two items that meet carry on requirements. ( I did get my bag inspected all five times I cleared security. They really wanted to see what that tripod head was. )
If your tripod has spikes on the feet see if they are removable. The ones on my tripod are fixed but I screwed the floor protector nuts down over the tips to make them appear less threatening.

Gaff Tape:
Take some foot long strips and tape them somewhere on the interior of your camera bag. For most small shoots you won't need a whole roll anyway.

Tip #3: Work with the TSA agents
When you approach the X-ray machine tell the agent that your bag has camera equipment in it and ask them if they would like you to place it separately into bins. Sometimes they will ask you to, other times they will just tell you to run it through whole. Generally after they see all the electronics in your bag someone will ask you to do a hand inspection. Just be cooperative and help them repack the bag if it helps keep your equipment organized. Remember they are given lot of discretion in the way they enforce the security regulations, so work with them.
Mar 7, 2010

Mexico City y Puebla

I spent the last four days in Mexico City and Puebla shooting video for Cisco systems and their partners Flip Video and Promethean. I'm very excited to be heading back in two weeks to follow up on the teacher trainings being carried out by my new friends, the DOT interns. Unfortunately I was unable to take a camera with me so there are no pictures! I promise to take a DSLR next time and bring back some images. Until then, hasta luego.

Feb 23, 2010

Pet Portaits - A few quick tips

I'm certainly not a pro at pet portraits but I've done a few and have a few tips to pass on. ( This is Abby btw, and a 16x20 canvas wrap print of this image was a Christmas gift for a friends mom. ) Ok, first three tips that come to mind....
1. Use Natural Light - Using a flash can startle ( or just annoy ) an animal. I prefer the aesthetic of natural light whenever enough is available. A large window can provide a convenient and beautiful source but lighting can be tricky because you can't just ask the animal to turn 90 degrees.

2. Know your animals - Especially when working with cats this will ensure that your subject is relaxed and comfortable. Dogs are a little more flexible and can be more animated when excited. Taking a dog to a park might make for great pictures but a cat would probably freak out. I know nothing about working with birds or reptiles. Just try to reflect the qualities the owner admires about their pet.

3. Work Quickly - This is not a model you're working with here. As long as the pet is comfortable with you around you're going to get the best shots within the first few minutes. Especially cats will lose interest with you and your clicking box as soon as they realize they can't eat it.

4. ( Bonus ) I generally use a 50mm lens to maintain a sense of proximity to the animal. It does require you to work closer to the pet to achieve a portrait shot size, but you will avoid the 'wildlife' photography compression of spatial relationships that comes with longer focal lengths. I feel it keeps things more personal, and you get a very photographic shallow depth of field as a bonus.

Oh yeah and manually focus because dog noses and cat whiskers can trick your AF off of the eyes.

Book Recommendation: Optics and Focus for Camera Assistants: Art, Science and Zen

Yes, this is the nerdiest book I've ever read. Whats nerdier is that I took notes on the whole thing.

I read this back in film school and it blew my focus skills wide open. I spent months thinking only in terms of depth of field. I cannot tell a lie, I'm a pretty amazing camera assistant and this book helped me get there.

This text is definitely more for filmmakers but a lot of the information is relevant to photographers. I don't know if the title "...& Zen" is a reference to the Robert Pirsig book Zen and the Art of Motorcycle Maintenance but Fritz Hershey seems to have a similar utilitarian perspective on his work.

Feb 15, 2010

Stuart & Jeff - Feb 14th 2010


I had my first opportunity to shoot a same sex wedding over Valentines weekend and it was a blast.

When I was originally contacted by Stuart I thought to myself, "... a wedding with no bride? This is what I've been waiting for!" and they were truly easy to work with.

Another reason this event was particularly fun was that it was in their beautiful home in Laguna Beach. The ceremony was held on their patio which has an incredible view of Catalina Island.

This was also my first traditional Jewish wedding.
You can see here the chuppa ( the 'c' is silent ) which I thought was an interesting tradition. It requires a person to hold up each of the four corners, and the chuppa holders are usually close family members. I think it makes a nice metaphor for the support of family and friends.

I enjoy these in-home weddings because I find that everyone is more relaxed and there are fewer hangups. Not to mention a beautiful home makes for a nicer backdrop than a hotel conference room. It was a little crowded with their 100 guests but I found ways to work around it.

Feb 12, 2010

Silkk the Shocker - how could I forget

I would just like to call attention to the fact that I have worked with rapper Silkk the Shocker. In case you weren't privy to hip hop back in '96, he was kind of a big deal. He is also the brother of rapper Master-P ( which yes, makes him Romeo's uncle ).
I had an unexpected opportunity to work with him back in 2007 for some clothing retailers or something. I just happened upon these pictures again while cleaning up my hard drives.

My product work gets around...

I love it when my product clients update me on the usage of my pictures. Right now I'm represented by StudBar Exercise Equipment on Amazon.com, and Sophia & Sam on Costco.com


At least I'm meeting somebody's standards :)

Feb 5, 2010

Dove Apparel - scrubs for days

I spent the last three days working with the good people over at Dove Professional Apparel helping them photograph their new lines of scrubs and medical apparel. They sell sweatshop-free, high quality garments to nursing and medical students across the county. Learn more at their website: www.doveapparel.comHere Souley and Myscha are looking professional in a unisex scrub top (one of about fourty style / color combinations we shot)John models a poly-blend mens polo in navy. I had a crew of four very dedicated models to get through this shoot. Patience and a collaborative spirit were crucial.